10 Best Drainage Tips for Container Plants
Table of Contents
- Why Drainage Matters for Container Plants
- 1. Ensure Your Pots Have Drainage Holes
- 2. How to Drill Drainage Holes in Existing Containers
- 3. Best Pots for Container Gardening
- 4. Choose the Right Potting Mix for Aeration
- 5. Add a Drainage Layer with Perlite and Vermiculite
- 6. How to Improve Drainage in Potted Plants
- 7. Use Pot Feet or Risers to Elevate Containers
- 8. Monitor for Signs of Poor Drainage
- 9. Watering Techniques for Container Plants
- 10. Preventing Root Rot in Containers
- Comparison Table: Drainage Solutions at a Glance
- Frequently Asked Questions
Last Updated: September 30, 2026
Why Drainage Matters for Container Plants
Poor drainage is the silent killer of container plants. When water sits in soil instead of flowing through, roots suffocate, fungi thrive, and your plants decline fast. The difference between a thriving container garden and a collection of dying plants often comes down to one factor: drainage.
Container plants depend entirely on you to manage moisture. Unlike ground gardens, potted plants have nowhere for water to go except through drainage holes. If those holes are blocked, too small, or missing, water accumulates around roots and triggers root rot within days or weeks.
At Beloit Plastics LLC, we've designed our planters with drainage as the foundation. Every pot in our collection features drainage holes and matching saucers engineered to collect excess water while promoting airflow underneath. This guide covers the 10 best drainage tips for container plants, from selecting the right pots to troubleshooting existing drainage problems.
1. Ensure Your Pots Have Drainage Holes
This is non-negotiable. Your container must have drainage holes in the bottom. Period.
Drainage holes allow excess water to escape after watering. Without them, water pools around roots, creating anaerobic conditions that lead to root rot, fungal infections, and plant death.
Multiple holes distributed across the bottom allow water to drain evenly. Beloit Plastics LLC's Austin Planter line features several drainage holes engineered to ensure proper drainage without any drilling required.

Inspect the bottom before buying. If there are no holes, drill them yourself or use it as a decorative cache pot with a draining pot inside.
2. How to Drill Drainage Holes in Existing Containers
If you have a pot you love but it lacks drainage holes, you can create them yourself. This is straightforward and takes minutes.
What you'll need:
- A power drill or hand drill
- A drill bit appropriate for your pot material
- A pencil to mark hole locations
- Safety glasses
Steps:
- Mark the bottom of the pot with a pencil. Space holes 2-3 inches apart, avoiding the very edges.
- Wear safety glasses. Ceramic and terracotta can splinter.
- Start the drill at low speed to prevent the bit from slipping. Increase speed gradually.
- Drill straight through the bottom. Apply steady, even pressure without forcing.
- For ceramic or terracotta, use a masonry bit. For plastic, a standard drill bit works.
- Create at least 3-4 holes for a 6-8 inch pot, more for larger containers.
Drill slowly to avoid cracks. For ceramic or terracotta, wet the area first to reduce heat. Let the pot dry completely before using.
3. Best Pots for Container Gardening
Not all pots are created equal. The best pots for container gardening combine drainage design, material durability, and practical saucer support.
Drainage-first design: Look for pots with multiple drainage holes and a matching saucer with a support grid underneath. This prevents moisture from pooling beneath the pot and promotes mold growth.
Material matters: Terracotta is porous and dries faster, ideal for succulents. Plastic retains moisture longer. High-impact polypropylene, like Beloit Plastics LLC's planters, offers durability without cracking in freeze-thaw cycles.
Saucer integration: A saucer collects excess water and protects surfaces. The best saucers have a ribbed underside with a support grid to promote airflow and prevent moisture from being trapped underneath.
| Feature | Importance | Why It Matters |
|---|---|---|
| Multiple drainage holes | Critical | Prevents water pooling and root rot |
| Matching saucer | High | Protects surfaces and collects excess water |
| Saucer support grid | High | Allows airflow to prevent moisture buildup |
| Pot material durability | Medium | Determines lifespan across seasons |
| Size range options | Medium | Lets you choose appropriate pot for plant |
4. Choose the Right Potting Mix for Aeration
The soil you use affects drainage as much as the pot itself. A dense, compacted potting mix suffocates roots and holds water too long. The right potting mix balances moisture retention with aeration.
Quality potting mixes are lighter and airier than garden soil, which compacts in containers and reduces oxygen exchange.
Look for mixes with peat moss or coco coir for moisture retention, perlite or vermiculite for aeration, and bark for structure. These create air pockets that allow roots to breathe and water to move freely.
Sample Pack 12-Piece Flower Pot and →
A mix of 40% peat/coir, 30% perlite, and 30% bark works for most plants. Succulents need more perlite (up to 50%) to dry faster.
Avoid potting mixes that feel heavy or compact easily when squeezed. These retain too much water and create anaerobic conditions around roots. Reputable brands list their ingredients, so you can verify the mix composition before buying.
5. Add a Drainage Layer with Perlite and Vermiculite
Creating a drainage layer at the bottom of your pot adds another safeguard against waterlogging. This layer sits between the pot bottom and the potting mix, promoting water flow downward.
Perlite is lightweight volcanic glass that creates air spaces for water flow. Vermiculite retains more moisture, useful for plants needing consistent moisture with aeration.
How to build a drainage layer:
- Add 1-2 inches of perlite to the bottom of your pot.
- Top with potting mix as usual.
- For extra assurance, mix perlite directly into your potting mix at a 1:3 ratio (1 part perlite to 3 parts mix).
The drainage layer isn't a substitute for drainage holes, it's supplementary. Perlite and vermiculite improve soil structure and water movement, but water still needs an exit. The combination of drainage holes, a quality potting mix with aeration components, and a drainage layer creates the ideal environment for healthy roots.
Avoid clay balls or rocks as a drainage layer, they reduce growing medium volume and can create a water barrier.
6. How to Improve Drainage in Potted Plants
If your plants are already struggling with poor drainage, you can fix it. The solution depends on whether the problem is the pot, the soil, or the watering technique.
7. Use Pot Feet or Risers to Elevate Containers
Elevating your pots is one of the simplest yet most effective drainage improvements. When a pot sits flat on a surface, water can pool underneath, creating a moisture barrier that damages decks, patios, and indoor floors.
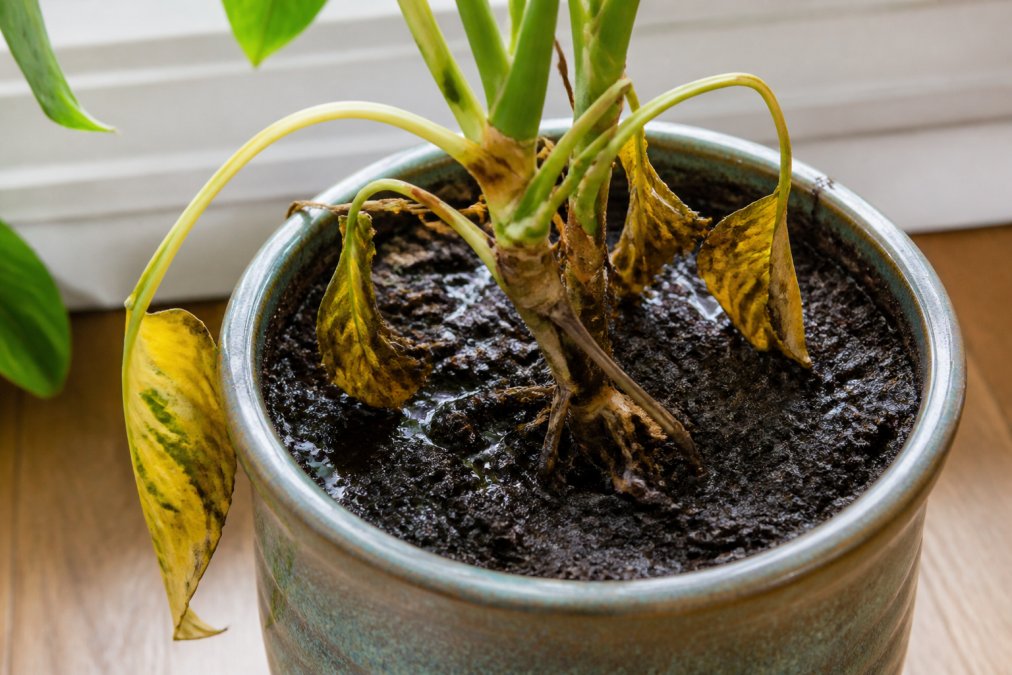
8. Monitor for Signs of Poor Drainage
Even with the best setup, problems can develop. Recognizing the early signs of poor drainage allows you to fix issues before they kill your plants.
9. Watering Techniques for Container Plants
How you water matters as much as your drainage setup. Even perfect drainage can't save a plant if you're watering incorrectly.
10. Preventing Root Rot in Containers
Root rot is the end result of sustained poor drainage. Prevention is far easier than treatment.
Prevention checklist:
- Use pots with multiple drainage holes
- Use quality potting mix with perlite or vermiculite
- Water only when the top inch of soil is dry
- Empty saucers after watering
- Elevate pots with feet or risers
- Ensure air circulation around the pot
- Repot annually to refresh soil and check root health
- Use a saucer with a support grid to prevent moisture pooling
Comparison Table: Drainage Solutions at a Glance
| Solution | Effort | Cost | Effectiveness | Best For |
|---|---|---|---|---|
| Pots with drainage holes | Minimal | Low | Critical | All container plants |
| Quality potting mix with perlite | Minimal | Low | High | Preventing waterlogging |
| Drainage layer (perlite/vermiculite) | Minimal | Low | Medium | Extra insurance against pooling |
| Pot feet or risers | Minimal | Low | High | Surface protection and airflow |
| Saucers with support grids | None | Low | High | Moisture management |
| Regular drainage monitoring | Minimal | Free | High | Early problem detection |
| Repotting with fresh soil | Moderate | Medium | Critical | Recovery from root rot |
Proper drainage is the foundation of container gardening success. When water moves freely through soil and out of drainage holes, roots thrive. When water pools, plants decline. The 10 best drainage tips for container plants all circle back to one principle: create conditions where excess water can escape and air can reach roots.
Frequently Asked Questions
What is the best thing to put in the bottom of pots for drainage?
A drainage layer of perlite or vermiculite works best. These materials create airspace that prevents soil saturation and allows excess water to move freely to drainage holes. Mix perlite or vermiculite directly into your potting mix at a 1:3 ratio, or layer them about 1 inch deep at the pot bottom before adding soil. This approach improves aeration and reduces waterlogging.
How can I improve drainage in my potted plants?
Start by ensuring your pot has adequate drainage holes. Use a well-draining potting mix rather than garden soil, which compacts and holds too much moisture. Add perlite or vermiculite to increase porosity. Elevate pots on risers or pot feet to allow air circulation beneath the container. Finally, adjust your watering schedule based on soil moisture, checking the top inch before watering. These steps together significantly improve drainage in potted plants.
What is the most common mistake with container plants?
Overwatering is the leading cause of plant failure in containers. Without proper drainage, excess water sits in the soil, causing root rot and oxygen depletion. Many gardeners water on a fixed schedule rather than checking soil moisture first. Always verify the soil is dry 1-2 inches below the surface before watering. Poor drainage holes or using dense soil compounds the problem. Combine proper drainage infrastructure with mindful watering to avoid this mistake.
Do all container plants need drainage holes?
Yes, all container plants need drainage holes to prevent waterlogging and root rot. Even drought-tolerant succulents and cacti require drainage to shed excess moisture. If you have a decorative pot without holes, use it as a cover pot and place a draining pot inside. Pre-drilled pots like those from Beloit Plastics LLC come ready to use without modification, eliminating guesswork and protecting your plants from the start.
