10 Best Practices for Storing Plastic Pots for Winter
Table of Contents
- Why Winter Storage Matters for Plastic Pots
- Practice 1: Clean and Dry Plastic Pots Thoroughly Before Storage
- Practice 2: Remove All Soil and Debris from Containers
- Practice 3: Stack and Nest Plastic Pots Safely for Space Efficiency
- Practice 4: Choose a Sheltered Location for Winter Protection
- Practice 5: Elevate Pots Off the Ground to Prevent Moisture Damage
- Winter Care for Plastic Planters: Practices 6-10
- Recommended Products for Winter Storage
- Frequently Asked Questions
Last Updated: October 13, 2026
Why Winter Storage Matters for Plastic Pots
Plastic pots face real stress when temperatures drop. Freezing cycles can crack containers, moisture trapped underneath accelerates degradation, and snow weight damages rims. Proper winter storage protects your investment and extends the life of plastic planters by years.
At Beloit Plastics LLC, we design our plastic pots to withstand harsh conditions, but even durable containers need thoughtful care during winter months.
This guide covers the 10 best practices for storing plastic pots for winter. These strategies prevent freeze-thaw damage, eliminate moisture problems, and keep your containers ready for the next growing season.
Practice 1: Clean and Dry Plastic Pots Thoroughly Before Storage
Clean pots before storing them. Dirt, mineral deposits, and organic debris trap moisture and create conditions for mold growth during months of inactivity. Rinse each pot with a garden hose to remove loose soil and debris.
For stubborn mineral buildup, mix equal parts white vinegar and water. Scrub the interior and exterior with a soft brush, then rinse thoroughly. Mineral deposits left behind can harbor bacteria and accelerate plastic degradation.
Drying is critical. After rinsing, stand pots upright in sunlight for 24-48 hours to allow complete evaporation. Moisture remaining inside the pot will freeze and expand, potentially cracking the plastic. Don't rush this step, complete drying prevents ice damage during winter months.
Practice 2: Remove All Soil and Debris from Containers
Empty every pot completely. Soil left inside absorbs and retains moisture, which freezes and expands, putting pressure on the plastic walls. This freeze-thaw cycle is one of the primary causes of cracking in outdoor containers.
Scoop out as much soil as possible by hand. For soil clinging to the interior, rinse the pot with water while scrubbing gently with a brush. Don't leave even small amounts of potting mix behind, every bit of soil you remove reduces the risk of moisture-related damage.
Pay special attention to drainage holes. Soil packed into these holes traps water. Clear them completely using a small stick or the end of a brush handle. Blocked drainage holes prevent water from flowing out during rain or snowmelt, leaving standing water that freezes inside the pot.
Once emptied and cleaned, inspect the pot for cracks or weak spots. If you spot damage, repair it with plastic epoxy or a patching compound designed for polypropylene before storage.
Practice 3: Stack and Nest Plastic Pots Safely for Space Efficiency
Stacking and nesting pots saves valuable storage space, but improper stacking causes damage. Stack only pots of the same size together. Different sizes don't nest evenly, creating pressure points that crack the plastic.
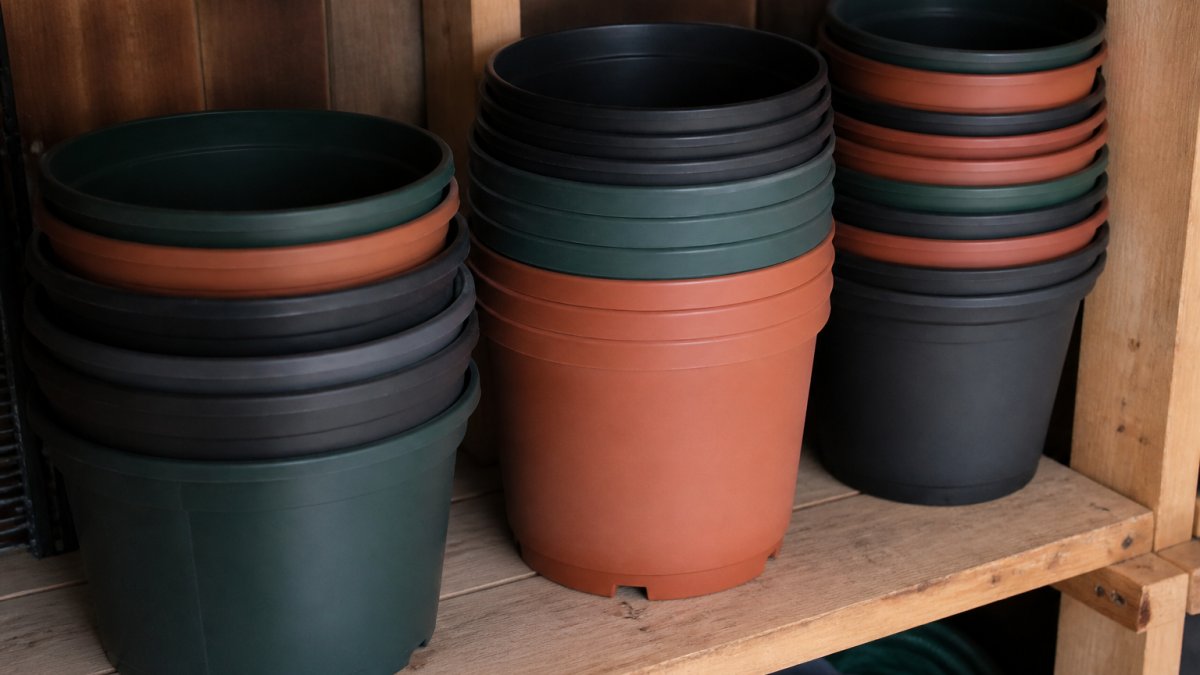
When nesting pots, place them gently inside one another without forcing them. If a pot doesn't slide in smoothly, don't push, you risk cracking both the inner and outer pot. The fit should feel natural and require minimal effort.
Limit stack height. Don't stack more than 5-6 pots high, even if they're the same size. The weight of pots at the bottom compresses the plastic and deforms rims. Shorter stacks reduce pressure and prevent permanent shape changes.
Place a soft cloth or foam sheet between stacks if you're nesting different batches. This prevents the rim of one stack from pressing into the side of another.
Practice 4: Choose a Sheltered Location for Winter Protection
Location determines how well your pots survive winter. Choose a spot that stays dry and offers protection from wind and heavy snow. An unheated garage, shed, or covered porch works well. If you don't have a fully enclosed space, position pots under an eave or against a wall on the sheltered side of your home.
Avoid areas with direct water runoff from gutters or roof edges. Melting snow and rain will pool around your stored containers, creating moisture problems. Position pots at least 3-4 feet away from downspouts and drainage areas.
Temperature fluctuations matter more than absolute cold. A space that stays consistently cold is better than one that freezes and thaws repeatedly. Garages and sheds provide this stability better than outdoor locations exposed to sun and wind.
Ensure good air circulation around stored pots. Stagnant air promotes mold and mildew. Leave space between stacks and don't pack containers tightly against walls. Air movement helps moisture evaporate and prevents fungal growth.
Practice 5: Elevate Pots Off the Ground to Prevent Moisture Damage
Pots sitting directly on concrete or soil absorb moisture from below. This moisture wicks upward into the plastic and freezes, causing cracks from the inside out. Elevate all pots off the ground using wooden pallets, plastic shelving, or sturdy benches.
Even a 4-6 inch lift makes a significant difference. Elevation allows air to flow underneath, preventing moisture from accumulating. This simple step addresses one of the most common causes of winter damage to plastic containers.
If you're using wooden pallets, inspect them first for rot or mold. Replace any pallet showing signs of decay, you don't want contamination transferring to clean pots. Plastic shelving is an excellent alternative because it doesn't absorb water and won't deteriorate over winter.
Ensure whatever you elevate pots on is stable and won't tip. Wobbly shelving puts stress on the pots and creates a safety hazard. The support structure should be level and rated to hold the weight of multiple full-sized containers.
Winter Care for Plastic Planters: Practices 6-10
The final five practices address covering, inspection, positioning, organization, and monitoring. Together, these steps create a complete winter protection strategy for plastic pots.
Practice 6: Cover Pots with Tarps or Plastic Sheeting
Tarps and plastic sheeting block rain and snow from accumulating inside pots. Use lightweight plastic sheeting or breathable tarps, heavy tarps can damage rims if they sag under snow weight.
Drape the covering loosely over stacked pots without sealing it completely. Pots need some air circulation to prevent condensation and mold growth inside the covering. Leave small gaps at the bottom edges for airflow.
Secure the covering with bungee cords or rope, but avoid pulling it so tight that it puts stress on the plastic. The goal is to shed water, not create an airtight seal. Moisture that can't escape creates ideal conditions for mold and mildew.
Check coverings after heavy snow or rain. Snow accumulation can damage pots if the weight becomes too great. Brush off snow gently and adjust coverings if they've shifted or torn.
LAP 12 inch flower pot and saucer 5 pack →
Practice 7: Inspect Pots Before Storage for Damage
Before storing, examine every pot carefully. Look for cracks, chips, discoloration, or soft spots in the plastic.
Run your hand over the interior and exterior surfaces. Feel for thin spots or areas where the plastic feels weaker than the rest of the pot. These weak points will fail under stress from expanding ice.
Check drainage holes for blockages and damage. A cracked drainage hole won't function properly and will trap water inside the pot.
Inspect saucers with the same attention. Cracks in saucers are less obvious than cracks in pots, but they cause the same problems.
Practice 8: Store Pots Upside Down or on Their Sides
Storing pots upside down prevents water from collecting inside them. Rain, snow melt, and humidity all create moisture that pools at the bottom of upright pots. Inverted storage eliminates this problem.
Upside-down storage works best for pots without drainage holes or with very small holes. If your pots have large drainage holes, they'll drain water naturally even when upright, but inverting them adds extra protection.
For large pots that are awkward to invert, storing them on their sides works well. This position also prevents water from pooling inside while allowing air circulation. Rotate pots occasionally so they don't develop permanent flat spots.
Don't store nested pots upside down, you won't be able to remove them easily in spring. Invert only individual pots or small stacks that nest loosely.
Practice 9: Separate Different Pot Sizes to Prevent Nesting Issues
Keep different pot sizes in separate storage areas or clearly marked sections. When spring arrives, you'll want quick access to specific sizes without digging through mixed stacks.
Separating sizes also prevents accidental tight nesting during storage. Pots that nest too tightly can stick together, and forcing them apart in spring can crack both containers. Organized storage prevents this damage.
Label your storage areas by pot size. Use masking tape or permanent marker on the storage shelves. Clear labeling saves time in spring and reduces the risk of damage from rough handling while searching for specific sizes.
Practice 10: Monitor Storage Conditions Throughout Winter
Check stored pots every 4-6 weeks during the winter season. Look for signs of moisture accumulation, mold growth, or damage from settling or shifting.
Remove any standing water you find around the storage area. Puddles indicate a drainage problem that needs fixing. Redirect water flow or move pots to a drier location if necessary.
Inspect pots for mold or mildew growth. If you spot any, wipe it away with a cloth and improve air circulation in the storage area. Mold won't damage plastic, but it indicates moisture problems.
Check that coverings remain secure and in good condition. Wind can loosen tarps, and heavy snow can tear plastic sheeting. Repair or replace damaged coverings promptly.
Recommended Products for Winter Storage
Proper storage starts with quality containers that can withstand winter stress. Beloit Plastics LLC manufactures durable plastic pots and saucers designed to last multiple seasons through harsh weather cycles.
The Sample Pack 12-Piece Flower Pot and Saucer Set (2"-12") offers graduated sizes perfect for organizing and storing different plants.

For larger containers, the MRAP 14 inch Pot and Saucer delivers premium durability. This 14-inch pot with matching saucer is manufactured in the USA from weather-resistant polypropylene.

For smaller plants and herbs, the Austin Planter 4 inch Flower Pots with Saucers (Terra Cotta 5 Pack) provides affordable, durable storage solutions.

For protecting stored pots from moisture, the Austin Saucers 18in Clear Polypropylene Pack of 2 offers extra protection.
All Beloit Plastics LLC products are made in the USA and backed by our commitment to quality American craftsmanship. Our pots and saucers are engineered for longevity, providing dependable performance throughout every season.
Winter storage protects your plastic pots and extends their usable life by years.
Frequently Asked Questions
How should you store plastic plant pots over winter?
Store plastic pots in a sheltered location like a garage, shed, or covered area where they won't be exposed to heavy snow, rain, or freeze-thaw cycles. Clean and dry them first, remove all soil, stack or nest them to save space, and elevate them off the ground using pallets or shelving. Cover stacks with a tarp if storing outdoors. This protects plastic pots from moisture accumulation, prevents cracking from freezing temperatures, and keeps them in good condition for spring planting.
Do plastic pots crack in freezing temperatures?
Yes, plastic pots can crack in freezing temperatures if water becomes trapped inside or around them. Freeze-thaw cycles cause expansion and contraction that stresses the material. To prevent cracking, drain all water from pots before storage, ensure they're completely dry, and store them in a sheltered location away from direct exposure to snow and ice. Elevating pots off the ground and covering them with tarps further reduces moisture exposure and the risk of freeze damage.
Should you clean plastic pots before storing them for winter?
Yes, cleaning plastic pots before winter storage is essential. Remove all soil, debris, and mineral deposits by rinsing with water and scrubbing with a soft brush if needed. Dry them completely to prevent mold, mildew, and moisture-related damage during storage. Clean pots are also easier to inspect for cracks or damage before being put away. Use mild soap and water, no harsh chemicals are necessary for plastic pots.
Is it better to stack plastic pots or store them separately?
Stacking and nesting plastic pots is the most space-efficient method for winter storage, especially for smaller containers. Stack pots of the same size with rims aligned, or nest graduated sizes inside each other to minimize footprint. Separate very large pots if they're difficult to move safely when stacked. The key is ensuring pots are clean and dry before stacking, and elevating the stack off the ground on a pallet or shelf to prevent moisture from pooling underneath. This approach saves storage space while protecting pots from ground-level moisture and pests.
